HomeAbout the BlogMeet the ChefsMeet the EpicutiesMeal IndexContact Us
Showing posts with label Fish. Show all posts

Monday, November 14, 2011

Butternut Squash Fries

Who doesn’t love fries???  I know I certainly do!  And I love butternut squash, so this recipe is a win-win for me, its so good.  This is a great side to almost any meal, although we have a great suggestion to pair it with below.  Its also one of the earliest finger foods that you can start your baby on!

Ingredients:

  • butternut squash
  • seasoning of choice, such as salt, season-all, or my personal favorite, Tony Chachere’s

Steps:

  1. Peel the butternut squash with a vegetable peeler.Old Photos 100 (640x425)
  2. Slice the squash into fry form. For the bulb part, make sure to scoop out the seeds.Old Photos 106 (640x425)
  3. Line a baking sheet with wax paper and lay the squash pieces as a single layer.Old Photos 107 (640x425)
  4. If your baby is very young (at least, less than 8 months), set aside a bit of the unseasoned butternut squash, and season the rest for your family.
  5. Bake at 425 degrees for 20 minutes, turning the fries over at the halfway point.

Timing: Without seasoning, this can be introduced as early as 6 months.

Meal Suggestions: Consider pairing with salmon, which is so easy to make!  Simply sprinkle the salmon with the seasoning of your choice, and bake at 350 degrees for 20 minutes.  Timing of fish introduction varies, but I started Little Frances on salmon at 9 months.  Click HERE to gather more information to make your decision.

Old Photos 113 (640x425)Epicutie Rating: Yummy in the Tummy --- See right side of the page for descriptions

Little Frances loves these two together!

Also, don’t forget about our Fundraiser/Giveaway. For a donation of ANY AMOUNT (even $1), you can be entered to win a 13 cup Kitchen Aid Processor!  For details, click here:

Tuesday, August 9, 2011

Tilapia Cakes with Avacado Tomatillo Sauce

Today's recipe was submitted by Jennifer and her daughter Sara. This is a super yummy twist to fish. It is especially good to make when having company so your little one can partake in the same thing as the group. Although I do not recommend the sauce for your little one, my husband and I LOVED the sauce, especially with a little brown rice too. Have fun with this one and thank you to Jennifer for submitting your recipe.

*If you would like to submit a recipe please email us at littletummyyummies@gmail.com and you might see your recipe featured here!*

Ingredients (Sauce) I do not recommend the sauce for your little one, it is a bit spicy:
  • 4 garlic cloves, peeled
  • 1 tomatillo husked and quartered (about 3 oz) -- (I used tomatillo sauce since I already had it on hand)
  • 1/2 medium vidalia or other sweet onion, quartered
  • 1/2 jalapeno pepper, seeded (I left this out)
  • Cooking Spray
  • 9 T chopped ripe peeled avocado (about one small avocado)
  • 1/4 C fresh cilantro leaves
  • 1 T fresh lime juice
  • 1/2 tsp salt
Ingredients (Cakes):
  • 2 cups bread crumbs divided
  • 1/2 C finely chopped vidalia or other sweet onion
  • 1/2 C finely chopped red bell pepper
  • 1/2 C finely chopped and sauteed zucchini or yellow squash
  • 2 T fresh cilantro
  • 2 T capers, drained
  • 2 T fat free mayonnaise
  • 1/2 tsp salt
  • 1/2 tsp ground coriander
  • 1/4 tsp freshly ground black pepper
  • 14 oz chopped skinless tilapia
  • 2 large egg whites
  • 1 tsp butter
Steps:
  1. Preheat broiler
  2. Sauce: Combine first 4 ingredients on jelly-roll pan coated w/ cooking spray. Broil 12 minutes or until blackened, stirring once. Cool slightly. Place tomatillo mixture in blender, add remaining sauce ingredients and blend until smooth. Cover and chill. (alternatively, I used tomatillo sauce and omitted the jalapeno, so I sauteed the onion, garlic and tomatillo sauce until browned and then followed the rest of the steps)
  3. Preheat oven to 400 degrees
  4. Cakes: Combine 1 C bread crumbs, with onion and next 9 ingredients (through egg white) - stir until well blended. Divide tiliapia mixture into 12 patties, dredge in 1 C remaining bread crumbs.
  5. Melt butter in non stick skillet, cook cakes 2 min each side, then bake at 400 degrees for 8 minutes or until done.
  6. Serve warm over brown rice---I do NOT advice the sauce for your little ones, that is for mom and dad to enjoy :) I gave Little Joy plain avocado to go with her cakes
Yield: 12 cakes (approximately 216 calories per cake)

Storage: Refrigerator for 3 days; fish does not normal refrigerate well, but this seemed to do fine when reheated. Just be sure to reheat on a low power level.

Timing: 12 months; be sure to watch them closely if they do not have many teeth.

Changes for next time: If I make this again, I will nearly puree the fish. Although I tried to chop it small, the chunks were too big and made the cakes fall apart.

Difficulty: 5 out of 5; this is relatively time consuming especially since your sauce needs to chill. Its a fun change of pace though and a great meal if you are having company!!!

Epicutie Rating: Somewhat Yummy--see right side of page for descriptions
Yummy in the Tummy for Little Sara (whose mommy submitted this recipe)
Little Joy gobbled up several bites and then wanted nothing to do with the cakes after that, even the next day. We have been struggling with her exerting her will at the table, so I am not surprised. She has been trying to reject favorite foods too. We do not allow her to do that, but it means sometimes she only has a bite or two of some foods. All in all I believe she liked it somewhat.


Cakes before dishing up.

This is how we served the cakes for us. Little Joy just had a cake, a bit of rice, some veggies and avocado.

First bite.

Second bite. Still looks a bit skeptical :)


Tuesday, June 14, 2011

Easy Peasy Baked Cod That is Always Eaten

I did not eat much seafood growing up, so this genre of recipe rarely comes to mind. However, knowing the goodness of fish, I am making a concerted effort to offer fish and other seafood to Little Joy.

There is a bit of back and forth on the timing to introduce fish to our little ones. The latest research says you can start as early as 6-7 months, but for the sake of the safety of our readers---I recommend a year.

This recipe came from wholesomebabyfood.com with some minor alterations to some of the proportions.

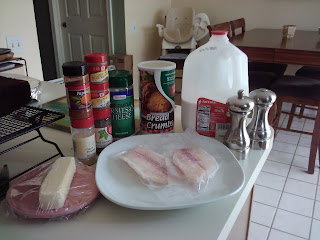
Ingredients:
  • 1/4 cup milk
  • 1 teaspoon salt (optional)
  • 1/4 cup bread crumbs
  • 1/4 cup grated Parmesan cheese
  • 1/8 teaspoon ground dried thyme (I only had dried leaves and it worked fine)
  • 1/8 teaspoon basil
  • 1/8 teaspoon pepper
  • 1/8 teaspoon paprika
  • 1 tablespoons garlic powder
  • Dash of ground oregano
  • 3 tilipia or cod fillets - medium to small sized, washed and cleaned of course (I used individually frozen tilipia fillets, worked well...follow package instructions for thawing and cleaning if needed)
  • 1/4 cup butter, melted (or less, just use what you think)
Steps:
  1. Preheat oven to 400 degrees.
  2. In a small bowl, combine the milk and salt.
  3. In a separate bowl, mix together the bread crumbs, Parmesan cheese, and all herbs/spices.
  4. Dip the fillets in the milk then coat the cod with the Bread Crumb mix.
  5. Place fillets in a glass baking dish, and drizzle with melted butter.
  6. Bake on the top rack of the preheated oven until the fish flakes easily, about 15-25 minutes. Keep a good watch and remove from oven once you see the fish flaky.
  7. Serve warm
Yield: 3 fillets; Little Joy ate 1/2-3/4 a fillet per meal.

Timing: 1 year. This food is super soft so it should be easy for your little one to chew/mash.

Storage: Fridge for 2-3 days depending on the freshness of your fish.

Difficulty: 2 out of 5; easy and fast!!

Epituite Rating: Yummy in the Tummy--see right side of page for descriptions
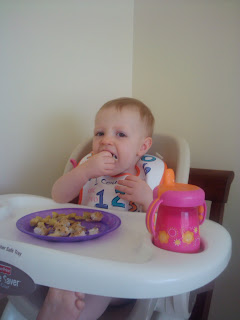
At first Little Joy was not sure what to do with the odd new texture of fish, but after moving it around in her mouth for a while she discovered it was yummy!! She said "mmmm" after every bit and even signed for more!

Ingredients

Step 3: Mix together bread crumbs, cheese and herbs/spices.

Step 4: My dipping and coating set up

Step 5: Pre-baking, with butter drizzled on. Looks like more butter than it really is...it seemed to roll off the fish when I poured it on.

The final product.

I served it with squash (will post about that later).

The first bite...check out that face!

Second bite...the face is improving.

This was after saying "mmmmm".

After my epicutie attacked it!!

Thursday, February 24, 2011

Salmon with Carrots and Tomato

It isn’t very often that two pen pals get together (less than 2 times in three years to be precise)!  So when we found out that Little Joy and Little Frances were going to have the opportunity to finally meet, we mamas wanted to make something extra special to commemorate the occasion!  As a rule, we try not to make things that are very fancy on this blog, but sometimes it fun to experiments and I love to celebrate a special occasion with food.  :)  I have been wanting to try to make fish, so I decided to try our luck with salmon.  I found this recipe in The Healthy Baby Meal Planner by Annabel Karmel.  Like most fish, salmon is filled chock full of essential fatty acids (EFA), also known as omega-3s.  EFAs help fight off many diseases are important for brain development… some people say they can make you “smarter”.  You can find more about the health benefits and hazards of fish here.  Some fish may contain high levels of mercury, which can lead to mercury poisoning, however salmon is not generally considered hazardous.

Ingredients:

  • 4 pen pals :)

Good All 2

Good of All

  • 2 1/4 cups carrots, peeled and sliced
  • 5 oz salmon filet, deboned
  • 1/2 tablespoon milk (or enough to cover the salmon, see method below)
  • 2 tablespoons butter
  • 2 medium ripe tomatoes, skinned, seeded and chopped.  To eliminate this step and make the recipe easier, you could also purchase a can of petit, diced tomatoes and measure out just under 1 cup.

DSC_0270

  • scant 1/2 cup Cheddar cheese, grated – i.e. do not pack the cheese into the measuring cup, there should be a lot of air cushion.

Steps:

  1. Steam the carrots for 15-20 minutes, or until carrots are tender. 
  2. Place the fish in a microwave dish, add the milk, dot with half the butter, and cover, leaving an air vent.DSC_0286
  3. Microwave on HIGH for 1 1/2 to 2 minutes or until fully cooked.***See below for alternative cooking method
  4. Melt the remaining butter in a saucepan, add the tomatoes, and sauté until softened and slightly mushy.DSC_0290
  5. Remove the saucepan from the heat, and stir in the cheese until melted.
  6. Mash the cooked carrots in the tomato mixture.  DSC_0292
  7. Drain the cooking liquid from the fish, remove the skin, and double check that there are no bones.
  8. Flake the fish and mix with the carrots and tomatoes.  You can also blend these two for younger babies or babies with no teeth.DSC_0296

DSC_0299

Miscellaneous: I really like kitchen gadgets and so I try to get a couple every few months.  I bought this microwavable dish on Amazon.com for $6, and it has come in handy for several recipes.  If you do not own a microwavable dish with a vent, you can always cook the fish in the following way:

  1. Place the salmon in a pan.
  2. Pour over enough milk to cover the entire fish.
  3. Simmer for 4 minutes or until cooked.

Timing: Fish can be introduced as early as 9 months, however as with any food, consult with your Doctor first.  The carrots and salmon break up quite small and so even without chewing this recipe (in my opinion) is safe for babies who are using their gums to mash, however, if you ever in doubt, puree!

Storage: Store in the fridge for up to two days.  This recipe makes quite a bit, so I could consider halving the recipe if you think that you will not be able to use it all in that time.  I would not freeze this recipe.

Difficulty: 4 out of 5.  This may be difficult for those with little cooking experience, and it also has several ingredients and steps.  I will be on the hunt for simpler fish recipes to try out!

Epicutie Rating: Yummy In The Tummy! Both Little Joy and Little Frances gobbled this one up!  They loved it.  Little Frances enjoyed it so much, Kelly suggested that we make a new rating called Yummy In The Tummy to the Max.  Even though this recipe was a little bit more complex than other recipes, it was worth it to see our girls enjoying the new flavors so well!

Little Joy clapping for JOY she loved this recipe so much!DSC_0308

Little Frances grunting for MORE!DSC_0302 

Our Epicuties!

Cutie Pies

SUgar

Cutest Babies

I am a warrior!


Little Tummy Yummies

About the Authors

This blog was started by two Babywise pen pals to document our adventures in high chair manners, making our own baby food and doing our bests to raise happy, healthy, thriving little ones!

Epicutie #1

Epicutie #1

Little Joy at 2 years, Sept 2012

Epicutie #2

Epicutie #2
Little Frances

Epicutie #3

Epicutie #3
Little Asher at 11 months, Sept 2012

Epicutie #4

Epicutie #4
Little Elizabeth, July 2013

  • Yummy in the Tummy: Epicutie thoroughly enjoyed each bite
  • Somewhat yummy: Epicutie seemed to somewhat enjoy the food at first, but seemed to like it less with subsequent bites
  • Not so sure I like it...yet: Epicutie somewhat rejected the first bites, but seemed intrigued. The next exposure may be better!
  • Confused: Epicutie rejected the first bites, perhaps due to texture or strong flavor.
  • Sour Puss: Epicutie gave a sour face indicating she did not like the food. However--if at first you do not succeed, try, try again!


  • Munchkin Land Designs Elements by Crisdam Designs

    Click Here for Other Awesome Giveaways!

    Labels

     
    Designed by Munchkin Land Designs • Copyright 2011 • All Rights Reserved