HomeAbout the BlogMeet the ChefsMeet the EpicutiesMeal IndexContact Us
Showing posts with label Puree. Show all posts

Tuesday, October 29, 2013

Raw Green Applesauce

I know that I have yet to post on Green Smoothies as I promised and as my penpal reminded me Smile, but I sat down to do it and realized that it was going to be much more involved than I had originally thought… and I just have not had the time. I wanted to try a few new recipes before I do that big post, but while I was searching I found this recipe at RawFamily.com. I love raw recipes! Its not a movement that I see myself joining, but raw usually translates to “easy” and “healthy” and I need to start frequenting more raw recipe websites and cookbooks!
Anyway, I found this recipe and I had to try it! It was just what a raw recipe should be – easy, fun. I enlisted the help of Little Frances to help me make it! Its so fun to have extra hands in the kitchen as our epicuties get bigger!
Ingredients:
  • 4 apples
  • 1 banana
  • 2 to 3 cups chopped romaine lettuce
  • ½ teaspoon cinnamon
  • up to 2 cups water
Steps:
  1. Chop apples into pieces, removing the core.
  2. Place half the water and the rest of the ingredients together in a blender or a food processor.
  3. Blend/process!
  4. Add more water if needed until you reach desired thickness.photo (21)
Yield: 3 cups
Storage: This can be kept in the freezer for up to 2 months. In the fridge, I would recommend no longer than 2 or 3 days since it is a raw recipe.
Difficulty: 1 out of 5. Easy, like most of the recipes I post on here.
Timing: 8 months. This is about the average age for introducing greens to small babies from what I can find.  Some recommend earlier, some recommend later. If you have concerns, speak with your pediatrician.
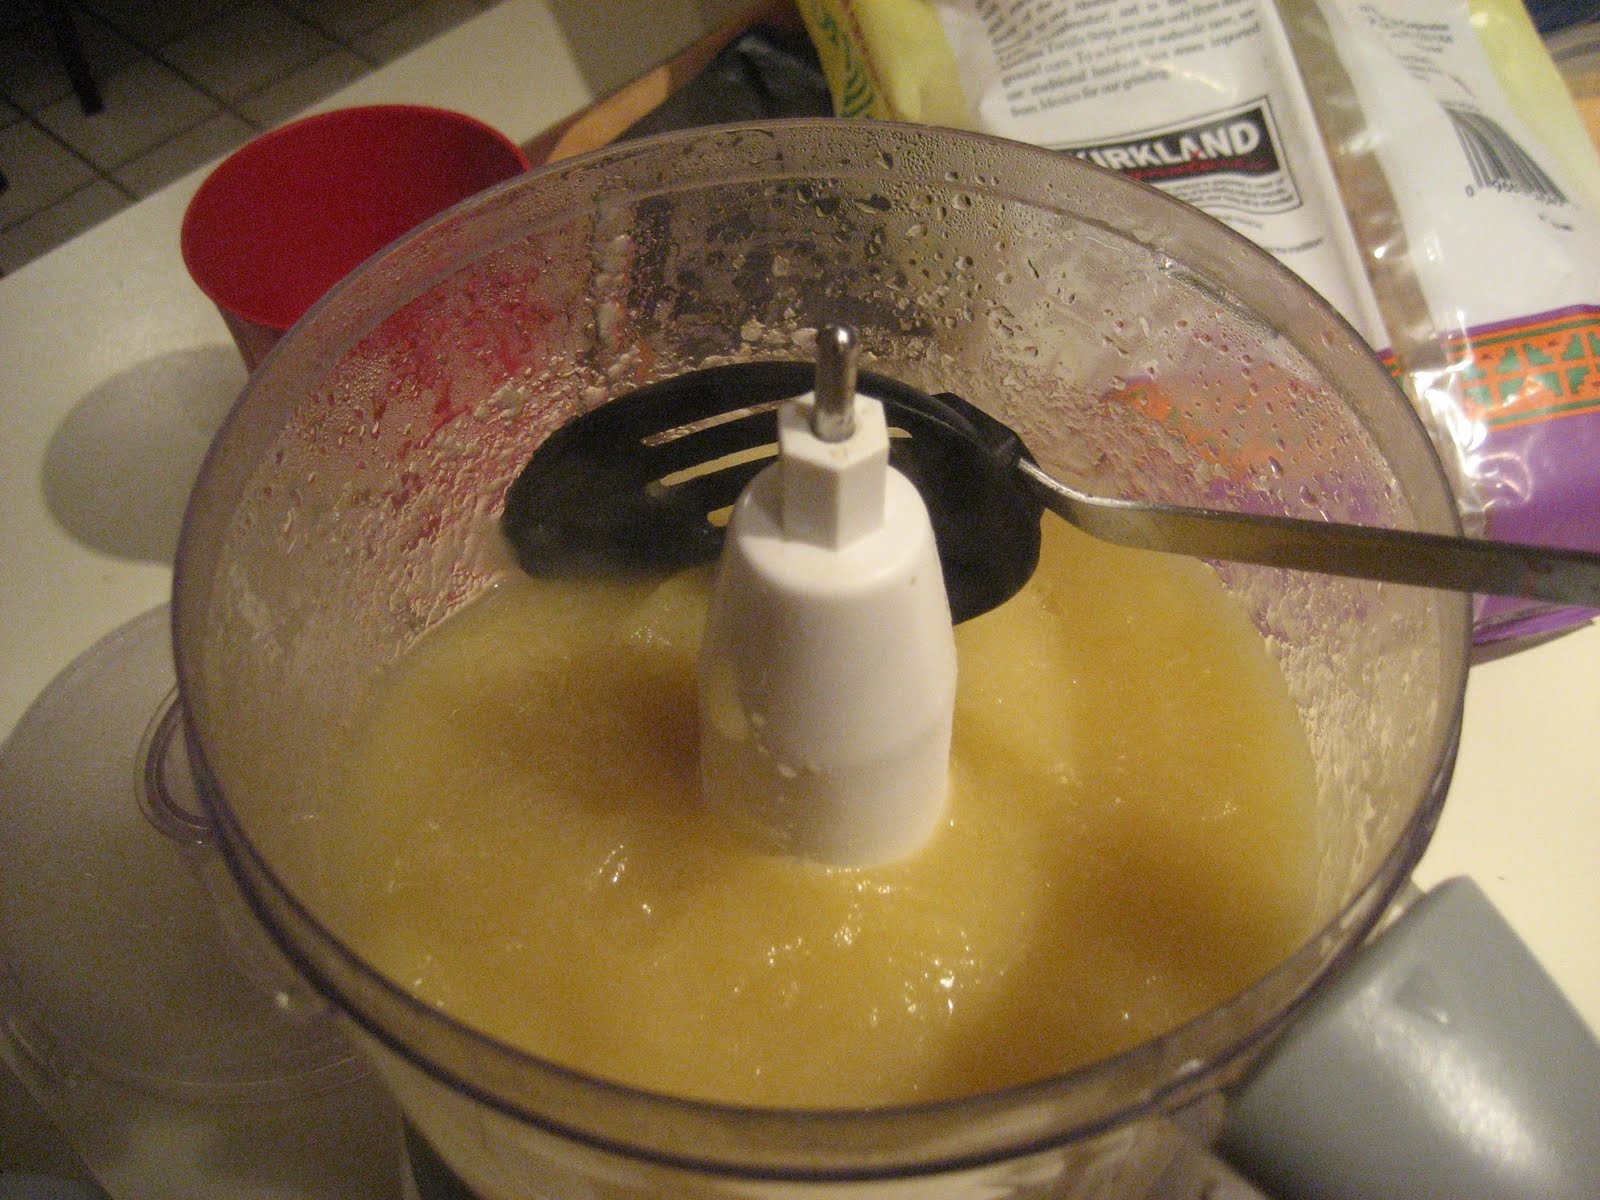
Miscellaneous: Our applesauce turned out a little brown since I had bought a pre chopped and rinsed salad kit that contained both red and green romaine lettuce. I also made the mistake of adding all of the water at once so it came out a little more soupy than saucy!  I recommend starting with a more conservative amount of water and adding as desired.
Epicutie Ratings (see left side of the page for ratings):
Little Frances: Somewhat Yummy! Little Frances’ enthusiasm may be due to the fact that she helped make it but she seemed to like it. It lost her interest after a while.
photo (22)
Little Elizabeth: Yummy in the Tummy! I failed to take a picture of Little Elizabeth, but she has loved it all three times she has eaten it!

Wednesday, September 11, 2013

Cheesy Broccoli Potato Soup


*Updated reviews 9/10/13, 
Original post on 3/5/12*
I LOVE my Parent's Magazine supplemental recipe book; I got one last year and just got another one in the March issue! Since I received it I have been anxious to post and review recipes. So far I have already cooked two things from it.

There is something nostalgic and soothing about nice big bowl of soup. I vividly remember cooking Campbell's chicken noodle soup with my mom even before I was in kindergarten; it was the first thing she let me cook "on my own". So when I saw this recipe for cheesy broccoli potato soup I couldn't wait to test it out.

You will be surprised how smooth and easy this soup goes down and it has only a light broccoli taste!!

Ingredients:
  • 2 tsp olive oil
  • 1/2 sweet onion, coarsely chopped
  • 1 medium potato peeled and diced into 1/4 inch chunks
  • 3 cups fresh broccoli chopped (I think frozen would work fine too)
  • 3 cups low sodium vegetable stock
  • 1 cup reduced fat mozzarella cheese (plus a little more for garnish)
  • Salt and Pepper to taste (optional)
 

1) Chop onion coarsely
For those of you who have seen the movie "Help" they said if you held a match between your teeth when you cut onions you wouldnt cry---MYTH BUSTED, it does not work!

2)  Heat oil in large stock pot

3)  When oil is hot, add onion and sautee for 5-7 minutes

4)  Meanwhile coarsely chop the broccoli and potato (peel and wash first of course).

5)  Add stock, broccoli and potatoes to pot; bring to a boil.

 6)  Reduce heat, cover and simmer for 20 minutes or until broccoli and potatoes are soft.

7)  Remove from heat and allow to cool slightly.

8)  Pour soup into food processor or blender, add cheese and puree until desired consistency.

9)  Add salt and pepper to taste, stir.

9)  Serve warm with a little shredded cheese on top for garnish.


Epicutie Little Joy digging in
(I should give background, she had a food strike at lunch and striked for an hour and half carrying on in her high chair wanting to eat everything BUT what was prepared for her.  After an hour and a half of listening to her scream and cry it was nap time so she went to bed with no lunch. She is a hearty eater so she was most definitely starving by dinner, which we had early since we knew she would be hungry.  SO she might have loved it because of that)

Remnants of her second bowl

Yield:  4 adult servings; its only 170 calories per bowl so we had a little more than one bowl.

Serve:  Warm topped with a little shredded cheese along side a salad (for adults) or chicken nuggets or sandwich.  We had grilled cheese with it.

Timing:  12 months since there is not much to this recipe ingredient wise and its also smooooth :) which means it does not require much, if any, chewing

Difficulty:  2 out of 5; super easy and quick.  This is something you could make while your kids take their afternoon nap and then reheat at dinner time.  That is what we did.

Epicutie Rating: 
Little Joy:  Yummy in the Tummy -- see left side of page for descriptions
Little Joy loved, loved this!!  We will be making this more next fall/winter!  Be warned breastfeeding mommies who eat this, broccoli can give your nursing babies gas; It sure did Little Asher!!!
Little Frances:  Yummy in the Tummy
Little Asher:  Yummy in the Tummy  Little Asher had FOUR BOWLS of this along with some pork loin, hungry boy!!!

Tuesday, January 17, 2012

Banana Cocolate Chip Waffles

We tried this "Double Delicious!" recipe on Christmas morning for the first time and were absolutely in love with it!!! I of course had to deviate from the official recipe since I didn't have the exact ingredients. This will be one of these things I only make on a special occasion.


Ingredients:

  • 1 cup whole wheat flour
  • 1 teaspoon baking soda
  • 1/4 teaspoon baking powder
  • 1/4 teaspoon salt
  • 3 tablespoons olive oil
  • 2 egg whites
  • 1/2 cup low fat buttermilk
  • 1/2 cup carrot purée (or 5 ice cube tray method sized cubes)
  • 1 large ripe banana, mashed
  • 3 tablespoons semi sweet chocolate chips (dark would also be good; I recommend regular sized chips not mini because the smaller chips burn more easily in he waffle iron)
  • Cooking spray


Steps:

  • Preheat waffle iron
  • In a medium bowl, combine flour, baking soda, baking powder and salt.
  • In a large bowl combine oil, egg whites, buttermilk, puree and banana; using a whisk whisk for 1-2 minutes.
  • Add dry ingredients to wet ingredients and stir with a wooden spoon just until combined; do NOT over stir.
  • Stir in chocolate chips.
  • Coat waffle iron with spray.
  • Ladle batter into hot iron (about 1/4 cup) and cook until waffle is lightly browned.
Serve:  Serve warm with pure maple syrup and fresh fruit.

Yield:  4 servings

Storage:  In refrigerator for 2-3 days.  To reheat, place in toaster oven.

Timing:  1 year; be sure your little one can chew breads well before offering this.

Difficulty:  2 out of 5; fairly quick and easy.

Epicutie Rating:  Yummy in the Tummy--see right side of page for rating descriptions
Epicutie Joy LOVED these waffles.  Every time the bite had a chocolate chip in it she would say "mmmm" and smil really big.  These were a hit and were especially fun for Christmas morning!

Saturday, December 10, 2011

Basic Spinach Puree

When Little Joy was around 12 months, I started looking for anything and everything I could make that was iron rich.  Since she was not formula fed, by the time she was 12 months her iron levels were slightly low.  Spinach was a obvious solution, but as I read about spinach I had no idea it was not only iron rich but also calcium and vitamin A rich too!  Basic Spinach Puree is super easy!!!

NITRATE WARNING:  Homemade spinach should be used in moderation before the 8 months of age.  And DO NOT USE ANY WATER used in cooking the spinach to thin your puree.


Ingredients:
  • Spinach (washed, long stems removed and damaged leaves removed)
Steps using a steamer:
  1. Place spinach in steamer
  2. Steam for 15 minutes
  3. Allow to cool slightly
  4. Remove from steamer and place in pureeing device
  5. Puree to desired consistency adding fresh water or breast milk to thin as needed
  6. Serve warm
  7. Freeze using cube method or refrigerate  
Steps without a steamer:
  1. Steam in a pot with a steamer basket insert (water should just peek through the holes of the basket).
  2. Leaves will shrink and appear wilted when done.
  3. Remove from pot and place in pureeing device
  4. Puree to desired consistency adding fresh water or breast milk to thin as needed
  5. Serve warm
  6. Freeze using cube method or refrigerate  
Storage:  Using freezer cube method 1-2 months; refrigerator 2-3 days

Timing:  8 months

Difficulty:  1 out of 5

Epicutie Rating:  Little Joy never had plain spinach puree, but when Epicutie Asher tries it, we will review it!!

Wednesday, October 12, 2011

Butternut Squash Puree

I realized we have never posted the basic Butternut Squash puree recipe!!!

Ingredients:
  • One Ripe Butternut Squash
Steps:
  1. Preheat oven to 400 degrees
  2. Cut squash lengthwise
  3. Scoop out seeds
  4. Place flesh side (squash meat side) down on a cookie sheet or in a casserole dish
  5. Add 1-2 inches of water to pan
  6. Place in oven for 35-45 minutes or until the skin begins to pucker and when a knife is inserted its soft.
  7. Allow to cool slightly.
  8. Scoop out meat and puree to desired consistency using water (not from the pan) or breast milk to thin as you feel necessary.
  9. Place in ice cube tray, cover and freeze for 24 hours.
  10. Remove cubes from tray and place in freezer bag for long term storage.
Storage: Refrigerator for 3-5 days; freezer for 1-2 months.

Difficulty: 1 out of 2

Timing: 6 months; this is a great food to introduce as a first or second veggie

Miscellaneous: This puree (without any thinning) can be used in a number of other dishes too!!

Epicutie Rating: Yummy in the Tummy--see right side of page for descriptions
Little Joy has always loved squash!!!

Tuesday, February 1, 2011

“Buttered” Noodles

I have really enjoyed diving into the world of finger foods with Little Frances! I love that she can feed herself; its a great way to keep her occupied while I get things done, plus I just love to watch her explore and test her independence. I have been racking my brain trying to come up with new and creative foods to tempt her little palate that she can also feed to herself, and I thought noodles might be a good food to try. Even though she’s usually an adventure little eater, she gave plain noodles a big fat sour puss rating!

I came across this recipe in the cookbook Deceptively Delicious, and I thought maybe all Little Frances needed was a much loved and familiar flavor while she got used to the noodles.

Ingredients:

  • 8 oz whole grain noodles - I used Fuseli because it seemed like it would easy for Little Frances to grasp and stay firm enough after cooking to be picked up.
  • 1/2 cup butternut squash puree
  • 1/4 cup milk
  • 2 tablespoons butter/margarine
  • 2 tablespoons grated parmesan cheese
  • 1/4 teaspoon salt

Steps:

  1. Cook the noodles according to package instructions.
  2. Drain the noodles and return to the pan.
  3. Add the squash, milk, butter, cheese, and salt to the noodles and stir until all noodles are evenly coated.
  4. Cut the noodles into bite sized pieces. If your baby has top and bottom teeth, you may want to keep it long.

DSC_0118 DSC_0121

Miscellaneous: This delicious meal can be enjoyed by the entire family! Just add salad.

Timing: 9 to 10 Months

Storage: I would store this in the fridge for up to 1 week, and in the freezer for 1 month.

Epicutie Rating: Somewhat Yummy! At first Little Frances was all smiles, so I thought that it was a hit, but she did not devour it the way she usually does foods she really likes. Eventually she was fussing and (semi) signing all done. I left it on her place at she continued to pick it thought while she was finishing the rest of her meal.

DSC_0130

DSC_0131

DSC_0132

Thursday, January 6, 2011

Chicken with Apples

Meats. Yet another interesting adventure into world of textures. Due to her sensitive tummy, Little Joy did not sample any meats until 9 months per the advice of our doctor. I would recommend asking your doctor before introducing any meats. Our doctor encouraged us to start with chicken, then move to turkey then beef and any other meats.

We decided to start with the Chicken and Apples recipe on wholesomebabyfood.com (you will have to scroll down a bit to find it) since Little Joy loves apples. There is not much to this recipe so I did not take any photos this time.

Warning: Meats are not only odd tasting, they are texture radically different from anything your baby has probably had. Be prepared for rejection and remember our mantra "If at first you don't succeed, try, try again"!

Ingredients
  • Cooked chicken (I used 2 chicken breast)
  • Applesauce from 2 apples (here is our applesauce recipe) or you can buy natural applesauce
Steps
  1. Bake chicken (baking maintains the most nutrients, but if you have to cook another way thats fine)
  2. Refrigerate the chicken after it cools and before you cut it (its easier to puree if it is cold)
  3. Meanwhile, Make applesauce (here is our applesauce recipe)
  4. Cut refrigerated chicken into 1 inch cubes
  5. Place chicken and applesauce in food processor; add liquid until you reach your desired consistency and puree until the thickness you want. I did one chicken breast VERY pureed and left the other a bit thicker to see which she liked better
  6. Freeze in cubes for up to a month; serve WARM
Timing: 9 Months (ask your doctor though)

Yield: Knowing that chicken may take several introductions I put less in the cubes for freezing than I normally do. This made about 12-16 oz of food. We may have trouble using it all!

Storage: In the fridge about 2-3 days, in the freezer about a month

Epicutie Rating: Sour Puss-see right side of page for rating descriptions. Little Joy would only eat 2-3 bites before she was signing "finished". We have tried it several times since the initial introduction and she eats more each time. I have a theory that she will like chicken better when she can have it has a finger food. She has enough teeth to eat it that way, but I am scared she will not chew it up enough and then it would be hard to digest.

Difficulty: 2 out 5; its easy just takes a while to make it since you *should* wait for the chicken to cool completely

Monday, December 20, 2010

Blueberries

Blueberries are high in fiber, rich in antioxidants and are packed with vitamin A and C; not to mention they can help with constipation!! For more information on the goodness of blueberries, check out wholesomebabyfood.com's site on Blueberries!

I loved the idea of introducing blueberries because it will be a wonderful finger food for a toddler, just grab, wash and GO! Blueberries were enticing to introduce also because they can help with constipation and I am always looking for ways to de-clogg Little Joy. I have heard mixed information about introducing berries before one year because they tend to be an allergen. After much debate, I went to my two main resources (the book "Super Baby Food" and the wholesomebabyfood.com website) to see what they recommended. Both shared that they can be introduced around 8-10 months since they are not the same kind of berries that are the usual culprits for allergies. PLUS my husband and I both do not have any food allergies that we know of, so her likelihood of having them is very low. I did decide to COOK the blueberries before serving them to make them easier to digest; after a year I will just puree.

WARNING: DO NOT feed WHOLE blueberries to a baby or young toddler, they can cause choking. Most recommendations are to wait until at least 3 years old before offering the blueberry whole. Also, you may want to ask your doctor before introducing berries if you baby is less than a year; I did not but you may want to since it has been known to be an allergen.

Ingredients:
Fresh blueberries (1 pint)
Water

Steps for COOKED puree:
  • Wash blueberries
  • Place berries in a pot and just barely cover the blueberries in water (about 1-2 inches of water)
  • Bring to a boil and then reduce heat and simmer for about 15 minutes
  • Remove blueberries from pot with a slotted spoon and place in your puree device
  • Puree until smooth adding blueberry juice (the water from your pot) until desired consistency is reached
  • SAVE THE LIQUID from your pot; just strain it before saving! This blueberry juice is great for adding to cereal to change things up a bit. I also froze some of the juice.
  • Freeze puree until frozen solid (about 12-24 hours if using ice cube trays) and after frozen, place in freezer zip lock bags until ready to use (I like to save about 2 servings in the refrigerator)
  • Uses for the puree: I prefer to add the puree to other foods such as pears, apples, yogurt, cereal etc.
  • Uses for the juice: So far all I have tried was adding it to cereal along with milk.
Steps for UNcooked puree (it is recommended you cook the puree if introducing prior to 9 to 1o months old, see below)
  • Wash blueberries
  • Puree using liquid (probably water) to thin until you have reached your desired consistency
  • Freeze puree until frozen solid (about 12-24 hours if using ice cube trays) and after frozen, place in freezer zip lock bags until ready to use (I like to save about 2 servings in the refrigerator)

NOTE: one ice cube is about an ounce of food

Timing: 8 to 9 months for COOKED puree; 9-12 months for raw mashed blueberries; 3 years for whole blueberries (depending on who you ask)

Storage: According to "Super Baby Food" by Ruth Yaron, this can be stored in the freezer for up to one year.

Epicutie Rating: Yummy in the Tummy---see right side of page for rating descriptions.
Epicutie Little Joy LOVED her blueberry cereal, blueberry apples and blueberry pears! I will try them with bananas and yogurt soon. I do not ALWAYS add fruit to her cereal because I want her to be able to eat it plain if needed. It also seemed to help de-clogg her, maybe a bit too much :)

Difficulty: 1 out of 5---this is SO easy!!!

In the pot with water, ready to cook

Simmering, errr...boiling here :)

I used a chopper vs a food processor since we are trying to move to thicker foods now that Little Joy is getting older.
The juice remaining

I stored the juice in the jar for 2 days before freezing.


Little Joy's reaction to blueberries; not too excited but definitely wanted more. At the end you will see a blueberry explosion!

Friday, November 19, 2010

Mangoes

I honestly gave Little Joy mangoes just because it sounded neat to try!

Ingredients:
Mango
Liquid for thinning

Steps:
  • Wash Mango
  • Dice mango
  • Steam mangoes until tender: Place mangoes in mesh colander and then inside a pot with a few inches of boiling water (mangoes are not touching the water)
  • Scoop out meat from peel
  • Puree until smooth adding liquid until desired consistency is reached
  • Freeze until frozen solid (about 12-24 hours) and after frozen, place in freezer zip lock bags until ready to use (I like to save about 2 servings in the refrigerator)
NOTE: one ice cube is about an ounce of food


Yield: 1 small mango yielded about 4 oz

Timing:
8 months

Storage: According to "Super Baby Food" by Ruth Yaron, this can be stored in the freezer for ten months.

Epicutie Rating: Not so sure I like it....yet---see right side of page for rating descriptions.
Epicutie Little Joy was a little taken back by mangoes. We will wait until the summer to try again

Difficulty: 3 out of 5---it was hard to get the peel and seed out!


Video of Little Joy trying mangoes, coming soon!!

Monday, November 8, 2010

Thinning Your Baby Food

Thinning your baby food (particularly purees) is a very important step in the baby food making process because:
  • It gives you the opportunity to add additional nutrients by adding breast milk (or formula)
  • It helps the foods be easier to digest due to the extra liquids in it
Here are a few tips that may be help as you thin your foods:
  • Water can be used to thin, however avoid using water that ROOT foods were boiled in (i.e. carrots). There could be traces of nitrates in them. See this article for more information on nitrates: Myths and Facts About Nitrates and Homemade Baby Food
  • I prefer to use breast milk when I thin foods since its filled with all sorts of good nutrients. The only down side is this requires you to pump and some women do not yield much when pumping. Formula may be used as well.
  • I have learned over time, it is easier to thin during the reheating process versus the cooking/freezing process. I thin the foods enough to make it fairly easy to place in the ice cube trays and that is all. When reheating, it is easy to get the foods too hot. I use refrigerated breast milk to thin and cool foods at the time I serve---it has been working great.

Sunday, November 7, 2010

Sweet Potatoes

Sweet potatoes are a great first food; they are high in fiber and vitamin A and are great if your Little One is having elimination issues, which is a constant struggle with Little Joy. This is also a great food for the whole family to enjoy so when you make some for your Little One make some for the entire family! When you heat the potatoes, set aside some cooked ones to enjoy with a little cinnamon and sugar as a side dish for Mom, Dad or other family members!

Making Sweet Potatoes is easy as 1-2-3....4, 5 :)

Ingredients:
Sweet Potatoes (yes, yams are the same thing as Sweet Potatoes in the U.S.)
Liquid for thinning

Steps:
  1. Wash potatoes and poke holes in them with a fork
  2. Microwave until tender (I did 6 potatoes and it took about 18 minutes in a 950 watt microwave); allow to cool, they will be HOT
  3. Cut potatoes in half to scoop the "meat" out with a spoon (to remove from skins) and place in your preferred puree device
  4. ***Puree until smooth adding liquid until desired consistency is reached (when I made these the second time, I used water vs. breast milk since I didnt have any sitting around)
  5. Freeze until frozen solid (about 12-24 hours) and after frozen, place in freezer zip lock bags until ready to use (I like to save about 2 servings in the refrigerator)
***I did not thin the potatoes much, only enough so that they would puree well. The potatoes seem to get hot FAST when I reheat to serve, so I add breast milk to cool them--that's when the thinning takes place for me.***

NOTE: one ice cube is about an ounce of food


Yield: 6 small/medium sweet potatoes yielded 41 cubes of food

Timing:
A great first food! 4 months, although the AAP recommends waiting to introduce solids until closer to 6 months vs. four

Storage: According to "Super Baby Food" by Ruth Yaron, this can be stored in the freezer for two months.

Epicutie Rating: Yummy in the Tummy--see right side of page for rating descriptions.
Epicutie Little Joy loves these every time she eats them!

Difficulty: 1 out of 5

After washing (there are 8 here, but 2 were for Mommy and Daddy)

After cooking

After scooping out the meat.
Be careful, sometimes when you scoop out the meat towards the bottom of the potato (see picture above), it will be VERY fibrous so try to avoid those areas when scooping it out because it will not thin well. It is safe to eat, just tough to puree.


After covering with plastic wrap---these are headed to the freezer!

Thursday, November 4, 2010

Butternut Squash Apple Bake

I wanted to test out some seasonal foods with Little Joy while the foods are available very fresh. Here is the first in a series of fall foods!

Ingredients:
One Butternut squash
2-4 Apples (I use fuji)

Steps:
  • Preheat oven to 400 degrees
  • Cut butternut squash in half long ways (my husband has to help me do this---its HARD)
  • Remove/scoop out all seeds and fibers from squash
  • Place butternut squash in a pan cut sides facing up
  • Peel and dice apples
  • Place apple pieces in the squash where the seeds used to be
  • Pour water over the apple pieces until the place where the seeds are is filled with water and apples completely (you can sprinkle with cinnamon but talk to your doctor before introducing spices, Little Joy has a lot of digestion issues so she wont be getting seasoning for a long time)
  • Cook at 400 degrees for 40 minutes or until the squash is soft
  • Scoop out squash meat and apples
  • Puree and add water (or breast milk/formula) until it reaches the desired consistency
  • Allow to cool
  • Pour into your freezing method (I prefer to pour into ice cube trays and cover with plastic wrap)
  • Freeze until frozen solid (about 12-24 hours)
  • After frozen, place in freezer zip lock bags until ready to use (I like to save about 2 servings in the refrigerator)
**NOTE: one ice cube is about an ounce of food**


Timing: Many resources recommend introducing squash veggies around 6-8months months.

Storage: According to "Super Baby Food" by Ruth Yaron, this can be stored in the freezer for two months. Also, fresh whole squash itself (raw and uncut) can be purchased and stored in a dark, well ventilated area place for about 2 months.

Epicutie Rating: Somewhat Yummy--see right side of page for rating descriptions.
Epicutie Little Joy seemed a little confused about this food. Squash has a strong flavor, so I think it took her by surprise. Subsequent exposures revealed she loved it; it took about three or four tries before she loved it.

Miscellaneous: Nutritional information on Winter Sqaush

Difficulty:
3 out of 5 (difficulty is in cutting the squash!!!)

(From left to right) Baking Pumpkin, Acorn Squash, Butternut Squash

After cutting and scooping out the seeds

Prior to baking


Sunday, October 24, 2010

Green Beans

Green beans are a staple food in our family. We (my husband and I) eat them all the time--in every way shape or form: sauteed, boiled, canned, frozen, with toppins and without. We love them. So, it is imperative that Little Joy learn to enjoy green beans!

Ingredients:
Frozen Green Beans (organic as available)
You can use fresh of course, but since this blog is about our adventures, I wanted to share what I did
Steps:
  • Cook according to package directions (watch for any salts added), cook until tender!
  • Puree in your food processor of choice; the green beans will not get completely smooth like other foods we have posted about
  • Allow to cool
  • Pour into your freezing method (I prefer to pour into ice cube trays and cover with plastic wrap)
  • Freeze until frozen solid (about 12-24 hours)
  • After frozen, place in freezer zip lock bags until ready to use (I like to save about 2 servings in the refrigerator)
**NOTE: one ice cube is about an ounce of food**

Timing: Many resources recommend introducing green beans around 6-8months months. I introduced them at 6 months and then later discovered that many babies reject homemade green beans since they cannot be completely smoothed in the puree process. To test this theory, I am going to offer store bought green beans which ARE perfectly smoothed. I will post a blog about the results.

Storage: According to "Super Baby Food" by Ruth Yaron, green beans can be in the freezer for two months.

Epicutie Rating: Sour Puss--see right side of page for rating descriptions.
Epicutie Joy has been offered green beans 4-5 times. Although she takes 2-3 bites fine, she will not take more than that. Based on the discovery that many babies do not like homemade green beans until much later, we will wait to attempt green beans again until 7-8 months. Remember, if you do not succeed, try, try again!

Difficulty:
1 out of 5


Green bean puree, notice the texture

I learned that the foods are much easier to "load" in the ice cube trays if I place them in a measuring up to pour. It is also less messy :)

Saturday, October 23, 2010

Applesauce

Apples (and applesauce) are not only tasty, but it also goes good with many other foods (winter squash, cereals, other fruits). Do not be afraid to mix foods together and taste your baby's pallet! Here is some additional information about apples that is GREAT!

Little Joy loves apples, by themselves or mixed with other foods---its always a hit. However, Little Joy has shown a tendency to prefer apples warm or room temperature vs. cold. So, if your little one does not like them at first, try warming them to see what happens.

Ingredients:
Fuji Apples
Steps:
  • Wash, peel and core apples
  • Chop into medium sized chunks
  • Place in pan and fill with water just covering the apples(OR you can steam them, but I do not have a steamer so I boil)
  • Boil until tender (be careful not to boil too long since the nutrients will all come out if you boil too long)
  • Puree in your food processor of choice
  • Allow to cool
  • Pour into your freezing method (I prefer to pour into ice cube trays and cover with plastic wrap)
  • Freeze until frozen solid (about 12-24 hours)
  • After frozen, place in freezer zip lock bags until ready to use (I like to save about 2 servings in the refrigerator)
**NOTE: one ice cube is about an ounce of food**

Timing: Many resources recommend introducing apples around 6 months

Yield: 1/2 cup applesauce per apple

Storage: According to "Super Baby Food" by Ruth Yaron, applesauce can be in the freezer for two months.

Miscellaneous: I found that peeling them shortways rather than around in a circle was faster. But a warning---your hand will get sore after all that peeling!

Money Matters: Please keep in mind, these calculations are approximations and prices vary depending on where you live. The standard of living where I am at is signficantly higher than other places in the country. I bought 12 apples (about 5.5 pounds) for $7.99 which yielded approximately 56 ice cubes of applesauce; $.14 per cube. I guesstimate that it takes 2-3 cubes to equal ONE Gerber apple container. There are TWO containers packaged together when you buy Gerber applesauce; they cost about $1.09 per package here. SO...
.14 per cube * 3 cubes per container * 2 containers = .86 (this is how much it cost ME to make one Gerber applesauce package)
Total savings PER PACKAGE making at home vs. buying = .23
That does not seem like much until you think about baby eating one container per meal several times a week---it adds up!

Epicutie Rating: Yummy in my Tummy--see right side of page for rating descriptions. Epicutie Joy prefers apples warmed or room temperature. Also, when I made my second batch I left a little texture in them and she did NOT enjoy that at all.

Difficulty:
2 out of 5


I bought these two crates at Costco. $7.99 for 12 apples, about 5.5 pounds. I made one crate in the pictures below.

Peeling, coring and dicing the apples

There were two pots like this to make 12 apples worth of food.

After cooking, pureed them until smooth.


I froze this many and reserved about 8 servings in the fridge or for my husband and I to eat (they are THAT yummy that we ate some)

Friday, October 22, 2010

Basic Carrot Puree

Basic Carrot Puree is easy and delicious!

Ingredients:
Raw Organic Carrots
Preferred Liquid of Thinning (I use breast milk but water or formula is good too!)
Steps:
  • Wash and peel carrots
  • Chop carrots into medium sized chunks
  • Place carrots in pan and fill with water just covering the carrots (OR you can steam them, but I do not have a steamer so I boil)
  • Boil until tender (be careful not to boil too long since the nutrients will all come out if you boil too long)
  • Puree in your food processor of choice
  • Pour into your freezing method (I prefer to pour into ice cube trays and cover with plastic wrap)
  • Freeze until frozen solid (about 12-24 hours)
  • After frozen, place in freezer zip lock bags until ready to use (I like to save 2 servings in the refrigerator)
Timing: Many resources recommend introducing carrots around 6-7 months
Yield: 1-1.25 cups puree per pound of carrots
Storage: According to "Super Baby Food" by Ruth Yaron, pears can be in the freezer for two months and refrigerator 1-2 days.
Miscellaneous: Carrots can be mixed with many things (peas, apples, pears, etc). See www.wholesomebabyfood.com for other ideas on carrots!
Test Subject Rating: Yummy in my Tummy--see right side of page for rating descriptions (Little Joy enjoys carrots with apples too)
Difficulty: 1 out of 5


Tuesday, October 19, 2010

Pear Puree

Making pear puree is simple, fast and tasty!

Ingredients:
Bartlett Pears (these are the yellow/greenish pears)
Steps:
  • Wash and peel pears
  • Puree in your food processor of choice
  • Pour into your freezing method (I prefer to pour into ice cube trays and cover with plastic wrap)
  • Freeze until frozen solid (about 12-24 hours)
  • After frozen, place in freezer zip lock bags until ready to use (I like to save 2 servings in the refrigerator)
Yield: 1/2 cup puree per pear
Storage: According to "Super Baby Food" by Ruth Yaron, pears can be in the freezer for up to a year and refrigerator 1-2 days.
Miscellaneous: Pears can mixed with many things to make foods more appealing (prunes, cereal, etc.). Pears are also good at moving the digestive system along!
Test Subject Rating: Yummy in my Tummy --see right side of page for rating descriptions (Little Joy has found a favorite food)
Difficulty: 1 out of 5


I am a warrior!


Little Tummy Yummies

About the Authors

This blog was started by two Babywise pen pals to document our adventures in high chair manners, making our own baby food and doing our bests to raise happy, healthy, thriving little ones!

Epicutie #1

Epicutie #1

Little Joy at 2 years, Sept 2012

Epicutie #2

Epicutie #2
Little Frances

Epicutie #3

Epicutie #3
Little Asher at 11 months, Sept 2012

Epicutie #4

Epicutie #4
Little Elizabeth, July 2013

  • Yummy in the Tummy: Epicutie thoroughly enjoyed each bite
  • Somewhat yummy: Epicutie seemed to somewhat enjoy the food at first, but seemed to like it less with subsequent bites
  • Not so sure I like it...yet: Epicutie somewhat rejected the first bites, but seemed intrigued. The next exposure may be better!
  • Confused: Epicutie rejected the first bites, perhaps due to texture or strong flavor.
  • Sour Puss: Epicutie gave a sour face indicating she did not like the food. However--if at first you do not succeed, try, try again!


  • Munchkin Land Designs Elements by Crisdam Designs

    Click Here for Other Awesome Giveaways!

    Labels

     
    Designed by Munchkin Land Designs • Copyright 2011 • All Rights Reserved